Mastering wheel building requires mastering spoke tensioning. Imagine it as an invisible force that makes our wheels strong and durable. Judging the wheel simply by its trueness is a dangerous state of mind. Most wheelset related problems, including but not limited to broken spokes often arise from it. Not trying to be dramatic about it, but it will literally make, or break the wheel.
It actually doesn’t take much time to come across some of the most common misconceptions that still arise from this subject. Or maybe they are just poorly expressed advice. Anyways, I gathered some of them:
- “Tighter is better” [in relation to achieving a stiff wheel],
- “The magic number” [in relation to one tension suits all],
- "How strong is the spoke" [in relation to deriving spoke tension solely from spoke tensile strength],
- "Tighten all spokes of a wheel the same" [in relation to averaging spoke tension],
- "Stress to relieve" [in relation to using extra tension as stress relieving technique].
We’ll discuss spoke tensioning in detail in the following article, so keep on reading.
WHY SPOKE TENSION IS SO IMPORTANT
When a wheel turns, based on their position, spokes are constantly loaded and unloaded. For each wheel revolution such spoke strain stress arise in a repetitive manner. Little calculation tells you this cycle of stretching and flexing happens over 450 times over one-kilometre-long track. Over time, under hundreds of thousands spoke strain cycles, fatigue gradually builds until spoke fails and breaks. There is only so many cycles that each spoke can persist not counting for all vibrations or potholes that may weaken your wheels. And if not built properly, us wheel builders contribute to spokes being even more susceptible to premature failure resulting in short spoke life.
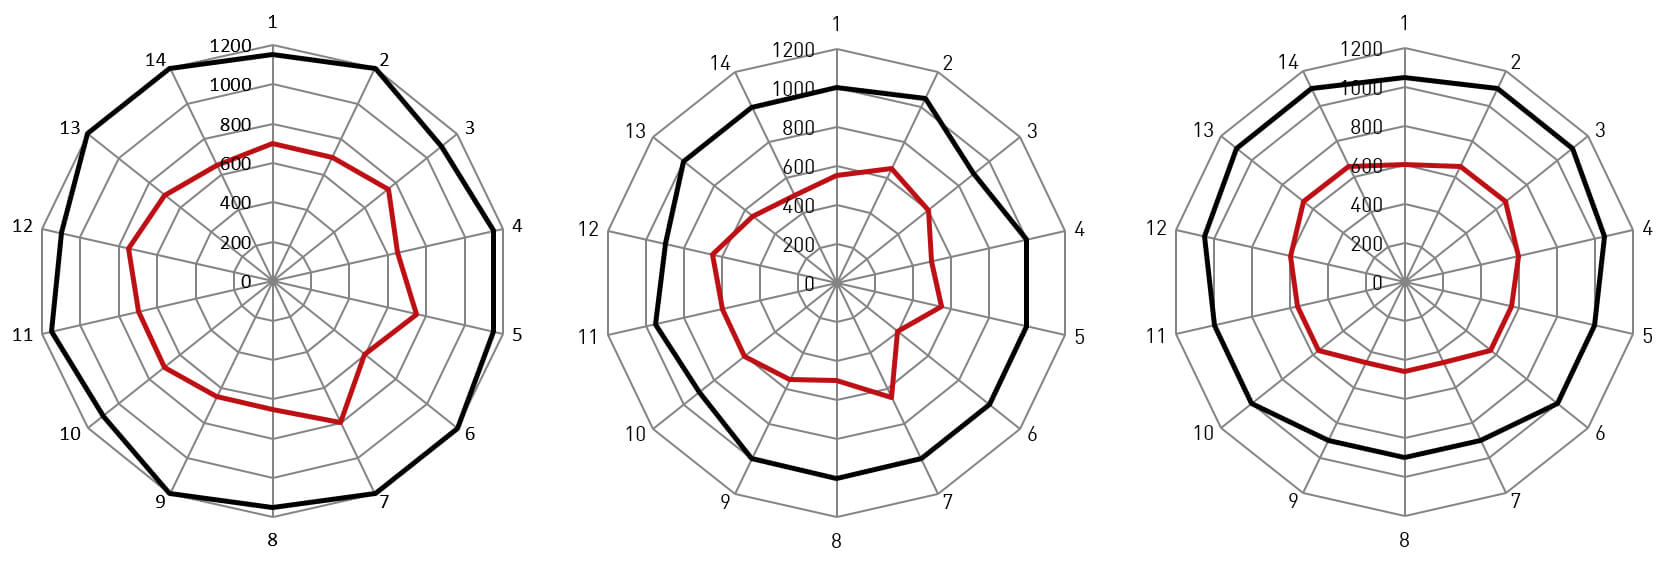
Take a look at this DT Swiss's fantastic representation of actual wheel tension under different conditions. See how tension actually changes from when its built (left chart) to when the tyre is mounted (middle chart) as well as when it is in use and under load.
It is very dynamic and complex. Therefore, one of main concerns of an experienced wheel builder would be getting the tension just right. While achieving perfect trueness and uniform tension is an ideal, it makes it difficult to accomplish in practice. But when done properly, even wheelsets with low spoke count or thin butted spokes can bare great weight load and for long term.
SPOKE TENSION - QUICK RECAP
In physics, tension can be described as a pulling force, transmitted axially, by the means of string, cable, chain on the object … [read more] and opposite of compression. If no bends in between, tension should be constant along the body (string) that transmits it and equal on both ends. Tension is measured in Newtons as 1 Newton is 1 Joule per meter while you will also notice the kilogram-force (kgF) unit to be used inherently. Comparing two units, 1kgF would be equal to 9.80N.
In wheel building terms, tension is the force, exerted at spokes, pulling hub and rim towards each other. By winding up single nipple, obviously we control lateral position of the rim (trueness) as well as effect the roundness of a wheel. And with it, we also inevitably apply tension to spoke and to all other components of the wheel - hub and rim included. In a perfect-world scenario each spoke pulls with equal tension to distribute the load (radial compression) evenly throughout the wheel and to resist lateral flex or possible torsion while still being true and circular.
That fact is what makes wheel building as intriguing as it is and more an art. And because of that we commonly talk of a wheel more of a structural system – a change in state of one part would greatly impact other parts.
TENSION RATIO EXPLAINED
If the hub is totally symmetrical, meaning both flanges are equally spaced apart from the center of the hub and of same diameter, then logically tension should be the same for both sides and tension ratio as close as can to 1. Usually this is the case for front (non-disc variant) wheel. But people rarely have problems with front wheels, as they have to carry less weight, have typically wider flanges with symmetric dishing and don’t transmit torsional forces. To explain tension ratio and it's implications at great detail, we must take a look at rear wheel's typical geometry.
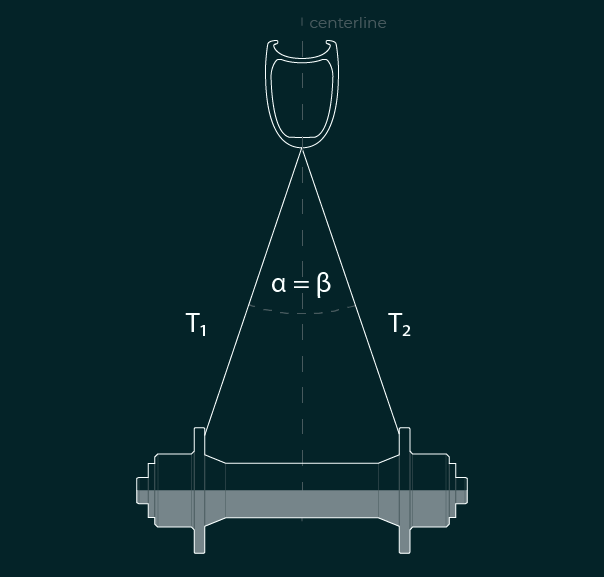
For rear wheel, however, the situation is quite different as the drawing below reveals. Since it’s generally asymmetric (let's leave track wheels aside), bracing angles won’t be exact same for both sides, therefore tension must differ also. This is all because of a process, called dishing, where at the finished wheel, the rim should stand in the middle of the hub’s centerline.
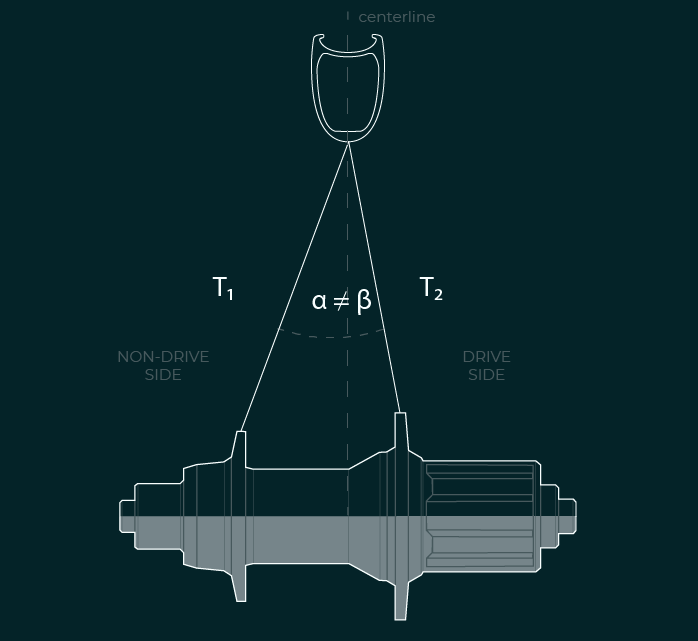
Not coming from physics field, I remember when I first read about this topic. It was explained probably in lamest of terms. I remember reading about a ship being anchored in the port with two ropes. On the front the rope would go straight to the pier at a very sharp angle while on the back it would be tied almost parallel to the ship. Exaggerated for sure, but to make things clear it should be obvious that the front rope would have to drag the ship towards the pier at a greater rate to hold it in place compared to the rope in arrears.
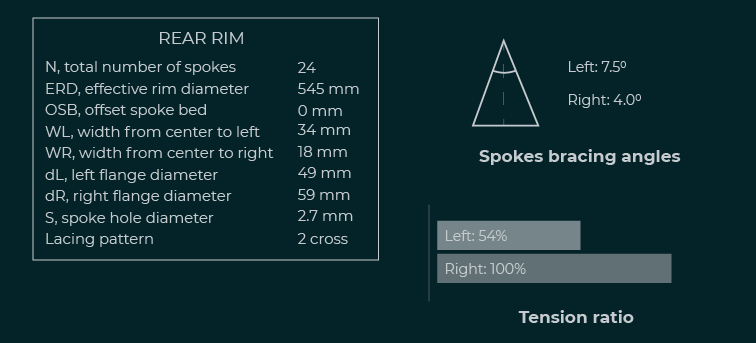
Let’s now check this theory on our rear wheel. Here are details of a wheel I put into a calculator. Standard stuff. Just take a look at bracing angles, we will need them.
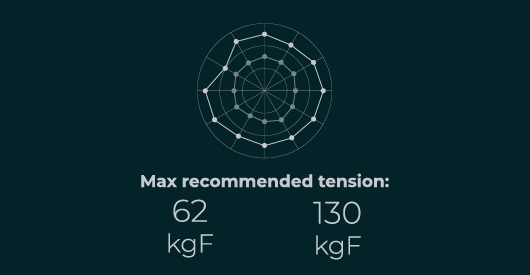
TIP: Besides identifying bracing angles, SpokeCalc also includes tension calculator for left and right side of the wheel. Put a maximum recommended spoke tension for the rim you are using and SpokeCalc will do the spoke tension calculation for each side of your wheel.
Let’s now look at wheel as a system. For such a system to be in equilibrium or at rest as we say, the sum of all forces to the objects would have to be zero. If we further decompose tension in spokes on each side, we get correlating vertical and horizontal force. Again, since net Force is 0, we can derive tension ratio equation knowing just bracing angles of a dished wheel in equilibrium.
Some spoke calculators will give you an output, also called tension ratio. Based on bracing angles from example above, we can calculate it as shown below:
T2 = 1.82 T1

Referred as the coefficient between each side average tension, therefore called tension ratio. In practice, you have probably seen expression like:
- tension ratio Left To Right (L/R) being 0.54 or
- tension ratio Right to Left (R/L) being 1.82
Although stated differently these two bullet points clearly represent the same thing. On average, tension in right side spokes would be 1.82 greater than the tension in the left side for the wheel to be dished properly. If we were builing drive side of our rear wheel with around 130kgF, our non-drive side spokes would only be tensioned at 70kgF. For every 1kgF increase in left side spoke tension, we would have to tension right side for additional 1.82kgF. And these are real life implications of knowing a tension ratio. Play with SpokeCalc's spoke tension calculator, enter maximum recommended spoke tension for the rim you are using and see what hub suits you best.
That said, identifying spoke tension ratio from a spoke tension calculator comes in handy also as a reference when comparing different wheel setups, picking your components in the first place or as a guiding point to calculate expected tension for each side of the wheel.
As you may notice, the greater the difference in bracing angles, tension ratio will be further apart from 1. Especially with the trend of adding extra sprockets onto rear cassette in newer road bike rear wheels, this brings noticeable change in its geometry and hence with it tension ratios of 1.5 and above. That is why most spoke related problems arise from non-drive rear side of the wheel.
Ok, we now see how tension ratio is interchangeably connected to bracing angles. Let’s now test what happens to it when we tweak some settings like Flange Diameter, Flange Offset or Offset Spoke Bed. All with the goal of trying to decrease our original tension ratio.
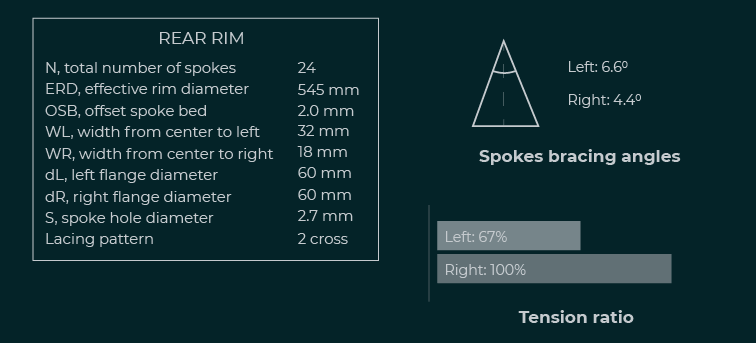
Change is noticeable, right? From 54% we came to 67% with:
- 2 mm decrease in left flange offset and got 4 percentage points,
- We evened up PCD's at 60mm. Small change, but improved stiffness due to spoke length reduction.
- BONUS: we added asymmetric rim! (with 2.0 mm OSB) and saw improvement for almost another 10 percentage points.
MEASURING SPOKE TENSION
While in the past, wheel builders had to rely mostly on their senses to judge spoke tension, nowadays there are variety of high precision measuring tools available on the market. They are so called spoke tension meters or tension gauges. We use them in the wheel building process as well as for diagnosing and salvaging used wheels. And to be honest, for most of us, they are an indispensable tool of trade.
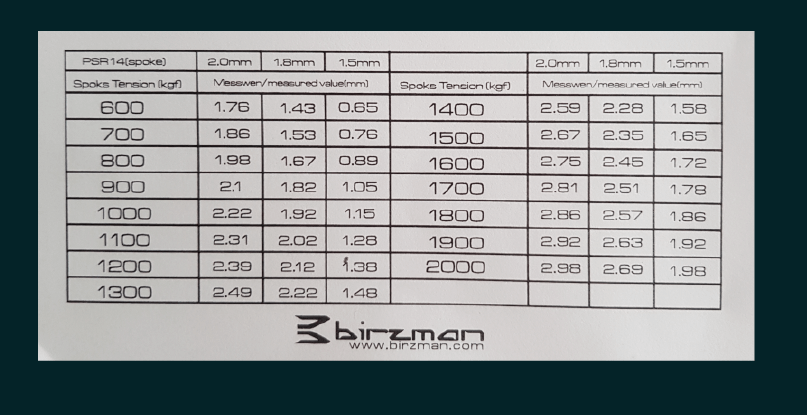
Such sophisticated measuring devices tend to operate by measuring spoke deflection when inserted between two fixed posts while applying load by one movable pressure post in the middle. Since spoke tension differs from spoke material, shape or diameter, each tension meter comes with a reference conversion table to interpret readings on the scale, being it digital or analogue.
However, meaning you have a tension meter at your disposal, doesn’t automatically make your wheelsets error proof. Having seen their manipulation in some workshops it is probably needlessly to emphasise, that dropped, damaged or worn out tension meter is next to useless. As high precision tool it should be kept safe and operated with upmost care, including the process of applying load on spokes when taking spoke tension readings.
Some spoke tension manufacturers like (Park Tool for example) provide standard reading charts, also named spoke tension chart, to be used across different spoke manufacturers. To use them, just navigate through table defining appropriate spoke material, dimension and desired spoke tension in the process. At the head of the table (first column) of a spoke tension chart, you should then be able to read expected spoke tension reading that your spoke tension meter will give you once you apply such tension on a spoke.
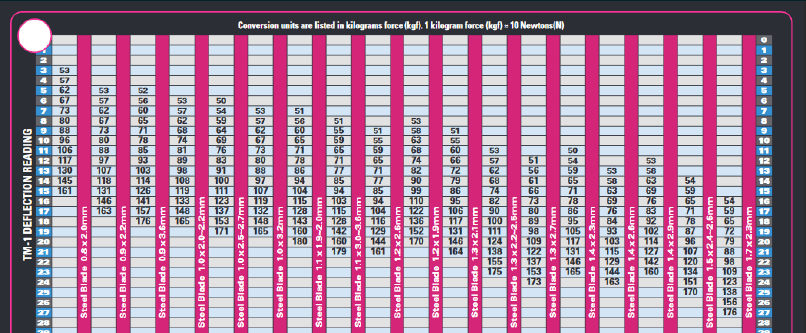
Here I would like to advise caution, as according to DT Swiss technical support, spokes from different manufacturers behave differently and so it is inadvisable to use spoke tension charts across different spoke makers carelessly. Meaning spoke tension meters should be calibrated separately with different tension conversion tables for similar spokes of different manufacturers. This partly explains why some tension meter makers (for example my Birzman tool) doesn’t include a comprehensive tension conversion table, such as Park Tool’s, despite being in the range of at least five times more expensive.
Tensioning by sound. Old school wheel builders still trust their ears by truing wheels by pinging spokes. Such checking of spoke tension by ear is called spoke pitch and if you want to read more about the subject, here is a great article on it. “Like the strings of a guitar or harp, bicycle spokes ring when plucked.” says John Allan. Using his technique, you should check musical pitch all around the wheel. Any mismatch in sound coming from spokes when plucked should be further inspected: slacked spokes should sound dull thud while in more tightened spokes you should notice a tone up. With practice you also get a good feeling what’s tight and what not. The guy also instructs how to inspect wheels laced 1 or more cross. Useful stuff for at least quick inspection of a wheel!
GETTING THE RIGHT SPOKE TENSION
So, by now you are probably asking yourself the million-dollar question, how tight is actually right? And what’s wrong with the first and second misconception?
To answer in short manner, there is absolutely no general tension that should be applied across all wheels. But yet again, as counterintuitive as it sounds, there is a broad range of acceptable tension that will suffice for a wheel to be built sound and within tolerances. But first, let’s examine two extremes, applying excessive spoke tension or on the other hand leaving spokes too slack.
If an excessive tension is applied to spokes, wheel tends to become susceptible to sudden deformation with few early signs. This however wasn’t the case for older generation rims, and if you read from Jobst Brandt, back in the days, it was a common practice to wind up nipples until rim buckled just a little and then decompress the whole rim slightly. Newer generations hubs and spokes are stronger and rarely indicate too high tension with early warnings. Rim might show a small crack just at the nipple, or it might suddenly pull nipple out of it. So is with hubs, especially light ones with extra drilled flanges.
Discarding proverbial saying “tighter is better” Damon Rinard showed clearly, that wheel do not get any stiffer when overly tightening spokes. His comprehensive wheel test shows us that: “Wheel stiffness does not vary significantly with spoke tension unless a spoke becomes totally slack.” Despite pretension applied, a spoke will actually elongate by the same amount when loaded, meaning that the spoke tension doesn’t make the wheel stiffer. Read more on this super specific article about the science behind spokes. You can influence wheel stiffness also by other means, not just spoke tension, like spoke count, bracing angles, rim depth and of course by choosing the right spoke itself.
Too little force on the other hand may leave spokes more vulnerable to fatigue and failure resulting in shorter spoke life. Remember that DT Swiss’s informative radar chart of spoke tension when fully functional (with tyre and weight load on)? Spoke strain (stress) becomes even greater in that case, no matter the spoke lacing pattern. Nipples are then very likely to go slack as the wheel has tendency to even up tension and so spokes may lose tension when they are distressed also by road vibrations or other impacts. Again, that would make a wheel unstable and allow its deformation such as lateral flex. When dealing with crossed pattern, you would notice a slight spoke movement which results in unpleasant sound coming from spokes rubbing themselves.
So, let's return back to our question. In DT Swiss’s blog you can read their elaboration: “The art of wheel building is to set the spoke tension as close as possible to the given maximum while keeping the deviation of the tensions between them as low as possible.” But what exactly is that maximum? When thinking of correct tension, one should consider two tension limits which are inherently tied.
Single spoke maximum. The system is only strong as its weakest link, but this usually isn’t the case for spoke itself and its tensile strength. Wire spokes are pre-tensioned and can withhold greater loads or compression than needed for a wheel. Breaking points will go towards 250 or even 300kgF. Maximum tension at each hole is usually provided by rim maker to prevent rim cracking or nipple being pulled out. Most rim manufacturers state this limit directly on the rim itself.
On the other hand, tension should be considered as total force on a whole system structure. There is only so much force a rim or a hub can handle. Surpassing that limit, and entire structure will become unstable or even dangerous as it may collapse without early warnings. Ask yourself, is it really worth getting it to the limit? What is the wheel’s main function anyways?
Here’s my two cents. I usually go seeking for maximum spoke tension when dealing with large difference in bracing angles, encountering torsional force or even having smaller flange offset’s. Most of this applies to non-disc road bike rear hubs. With tension ratio of let say 1.85, you may easily be left with one side on the verge of going slack if not using proper vibration-reducing means. For front wheels that usually have wider flanges with similar bracing angles I tend to go 5-10% below that value. But spoke count and lacing pattern come also in decision scope. Yap, for higher spoke counts, tension for single spoke should be decreased accordingly.
After reading all that, you should take this disclaimer with better conscious. Even though my SpokeCalc has a spoke tension calculator built-in, what it gives you is just a reference point, derived from a spoke tension ratio. And as such it must be taken with precaution as it will not account for the total force put on the wheel (read again the paragraph about total force on the system structure).
SPOKE TENSION GRAPH - RADAR CHART
If you still recall, one of our initial misconception was “getting spokes tightened equally”. Basically it is just a trivialization or generalization of a more complex subject.
During the wheel building process, one should simultaneously keep track of several aspects. Firstly, the wheel must be true. Secondly, it should be round without any wobbling. Thirdly, final trued wheel should be dished properly, meaning rim is in the very center of the hub. And lastly the spoke tension on each side should be balanced. In other terms, spokes on each side should be tightened with minimal deviations (equally). Putting this misconception to rest, try to tighten all spokes on the wheel equally disregarding other limitations and in 99% cases you won’t get it true!
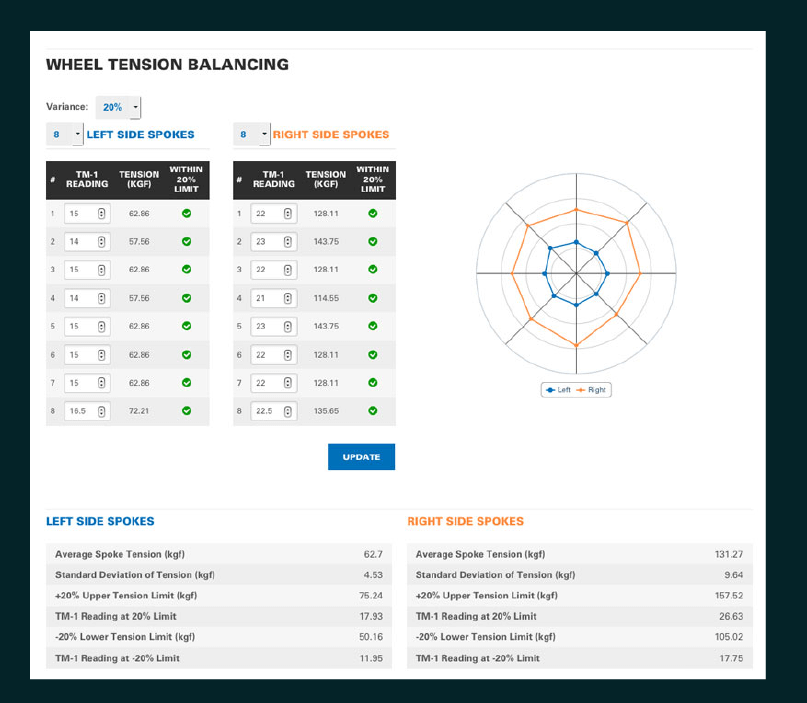
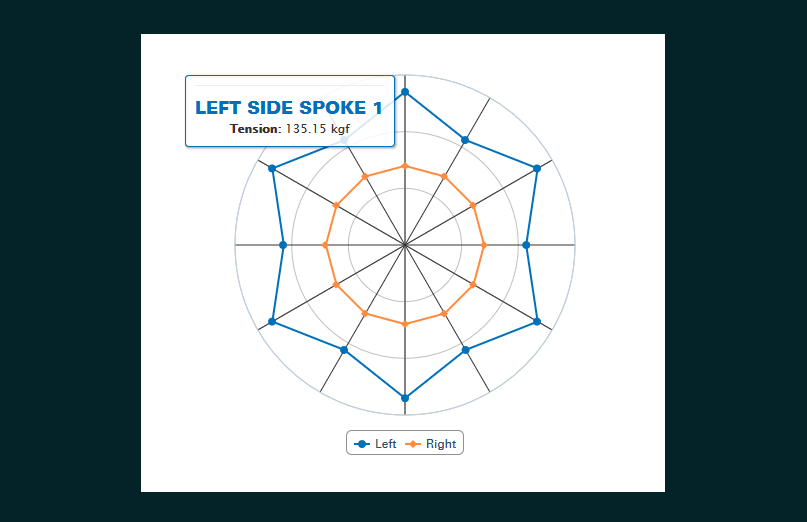
But instead of memorizing all spoke tension readings, you can make use of so called radar chart or a wheel building chart. It is a visual representation of spoke tension readings on circle shaped (radar) diagram across the wheel, for both sides shown separately.
Seasoned wheel builders use this tool in several ways. It is not as frequently used invariably during the wheel building process (to indicate deviations in spoke tension) as it is a result of readings after the wheel has been trued and dished. Only then it might show any rim deformation as it indicates anomaly (deviation from the expected) in spoke tension across all spokes on one side. In that way, it reveals potential problem areas of your wheel in terms of too much spoke tension variation – spokes being overtightened or slacked for each side. Such dents in wheel building chart, that is not near to round, show rim bents or other deformations. Basically, If you can't meet first three conditions (true, round and dished wheel) with even spoke tension on each side, it's probably time for a new rim.
On the other hand, tension radar chart can also reveal improper tensioning on otherwise true wheel. Sometimes you might get an interesting zig zag pattern where one spoke of a pair (either leading or trailing) will be more and the other less tightened. But all in all, this pair of spokes would still hold the rim dished in the center and trued. Somewhat hidden problem it would seem until you check tension of every spoke.
As a result of hand build wheelset, pro wheel builders often also disclose such radar charts to their clients as a proof of built quality. Inarguably one of the most visually appealing and informative tool available is Park Tool’s Wheel Tension App. You can use it during wheel building stage to track spoke tension readings across each side as well as for diagnosing potential “pain points”, mentioned earlier.
FINAL THOUGHTS ABOUT SPOKE TENSION
Even if you are a seasoned wheel builder, taking all limitations into consideration and meeting every single condition stated above is sometimes just near to impossible. And if you are new to all of this, it might be a bit much, for sure. But I always say, there is never too much information and errors often have their logical patterns. In the end it all comes down to practice and of course, taking records! Just don’t rush.
But again, tension meter isn’t some magic tool to take your builds to the whole new level. If not operated and maintained properly, it could even deceive you in the process. So, heads up and happy wheel building!
Enjoyed this article?
Buy me a coffee to support my work!
Every coffee helps fuel more content like this!
About author

Aljaž Trenta
Author and founder"As a cycling enthusiast, bike mechanic and self-taught web designer, combining several of my passions and skills to build SpokeCalc was a great fun for me."
