From time to time, it happens even to seasoned wheel builders. You finish a wheel building project and spoke length is off. Either spokes came short or longer than you intended. And then a never-ending mind process of figuring out where you did a mistake starts… We have all been there. But just thinking hard about it won’t make your spokes inside the wheel shorter or longer. Reality check - knowing what wheel measurements are important is a useful information. Errors in measurements will give you wrong overall spoke calculation.
Note: To fully understand this article and terminology regarding wheelbuilding measurements used, I suggest reading my basic article on taking measurements for wheel building first.
How precise do spoke sizes need to be?
A quick online search will give you a plethora of concerns regarding the correct spoke length or how precise do spoke lengths need to be and that it is foolish to simply advise to round up a spoke length. To sum up, you should be aiming for the best possible thread engagement of your nipple, bearing in mind that some spoke/nipple brands give you no leeway for the spoke to be long, meaning you run out of thread and thus ending with an untrue wheel with bad spoke tension. On the other hand, using too short spokes and miss more than 1mm or so of thread engagement introduces some risk of the nipple breaking, especially in the case of having aluminum nipples.
Therefore, your calculation must be accurate. You don't want to miss more thread engagement than around 2mm from perfect. Since thread count usually changes with nipple length, longer length nipples usually have more threads, and you need to compensate for this to avoid bottoming out the threads on the spoke. See Sheldon Brown's article on spoke length and his widely known image of cross-sectioned spoke nipples.
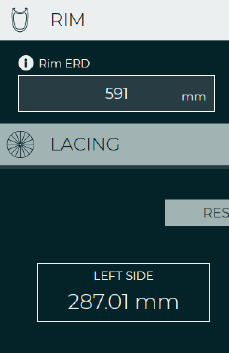
WHEEL DATA
To compare a degree to which one measurement error has an effect on a total spoke length calculation, I am at this point introducing a coefficient, let’s name it K factor. Basically, it will tell us how missing a correct hub or rim measurement by 1 mm will distort total spoke calculation. In other words, K = 0.6 will tell us that taking a wrong hub or rim wheel measurement by 1 mm will give us a wrong spoke length by 0.6 mm, get it? Smaller the K, the lesser effect this measurement has on a spoke length calculation.

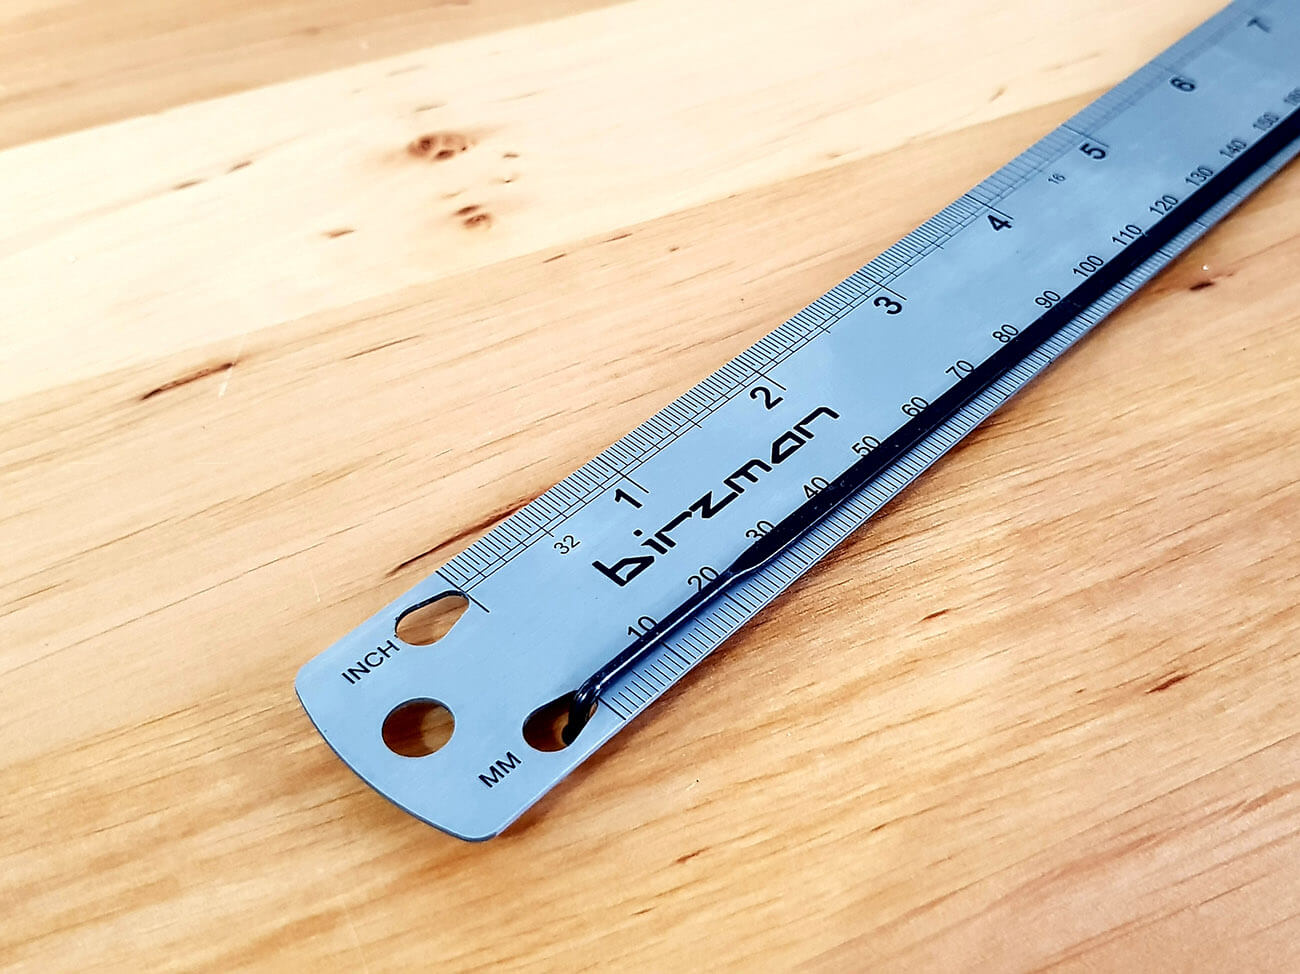
So, let’s start with a hypothetic data of a rear wheel. Hub measurements are stated in the image below, as for rim and lacing data, here are details:
- Effective rim diameter, ERD = 590 mm,
- Offset spoke bed, OSB = 0 mm,
- Spoke count = 24,
- Lacing pattern = 2 cross.
WRONG HUB MEASUREMENTS
Flange diameter / Pitch circle diameter
Getting wrong flange diameters by a small margin will not greatly affect the total spoke length. Wrong left flange diameter (also left P.C.D.) will distort only a spoke calculation of your non-drive side spokes and vice versa, obviously. So, when I change left PCD by 1 mm, my non-drive spokes change by 0.22 mm. Smaller the PCD, longer the spokes. Should be right!
At that point, I also wanted to know if a 1 mm change in larger PCD (70 mm for example) has lesser or greater effect. But the margin is so small that I couldn’t prove it.
K = 0.22
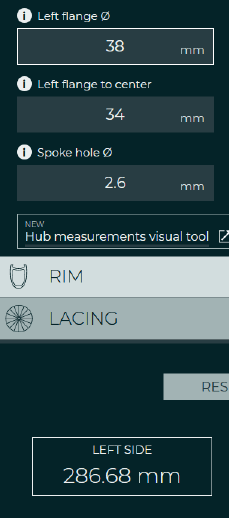
Flange to center measurements
Flange to center measurements are also an important measurement, vitally needed for your spoke length calculations. Mistakes in measuring flange to center are more common, since you often start from the outside, first measuring Locknut to flange first and then subtract this number from the half of hub’s width (O.L.D. / 2).
Again, getting wrong left flange to center measurements will only have an effect your non-drive spoke length. But looks like this measurement has even smaller effect on the spoke length calculation than getting a wrong pitch circle diameter. When I increase Left flange to center dimension by 1 mm, non-drive spokes calculation come shorter only by 0.12 mm. Moreover, when dealing with a smaller flange to center dimension, for example in my case, where a Right flange to center measurement is only 17 mm, the difference is even smaller, only 0.06 mm. Logically, as the leg of a right triangle is shorter and its change has a lesser effect on a hypotenuse length which in our case represents the drive side spoke length.
K = 0.06 / 0.12
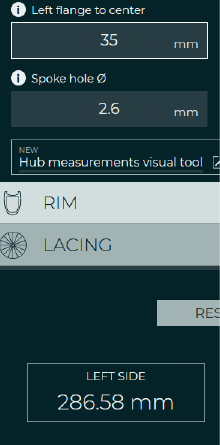
Spoke hole diameter and spoke offset
There are two more hub measurements left to be debated. Spoke hole diameter is common for classic hubs, while you will inevitably encounter spoke offset measurement when dealing with straight pull hubs.
Interestingly, both measurements actually have a great effect on a correct spoke length. Get your spoke hole diameter wrong by 1 mm and your spoke length calculation will be off by 0.5 mm. Larger spoke hole in your hub’s flange will actually move spoke closer to the rim, by half of it - the radius. All drama aside, since spoke hole diameter in most cases is around 2.5 mm, you will hardly be wrong by a full millimetre. That is why most spoke calculators Frequently asked question sections (FAQ) imply that you use that specific number if not sure.
K = 0.5
On the other hand, since I know how a spoke calculator works for straight pull hubs, getting a spoke offset wrong by 1 mm will give you a wrong straight pull spoke length by a full millimetre. You see, after everything calculates out in a spoke calculator, a spoke offset is added or subtracted (if the spoke offset is negative) to the final spoke length. That is why this is probably one of the most important measurement of straight pull hubs!
Note: When dealing with a radial lacing pattern and straight pull hubs, your spoke offset is 0!
K = 1
WRONG RIM MEASUREMENTS
Effective rim diameter
Rim measurements are often accessible online. But one must also consider how this ERD measurement was taken in the first place. For example, in my other article, I was experimenting with different spoke nipple types and finding out the difference in total ERD measurement for 5 different nipple type variations. Results were not neglectable and one should definitely take it into consideration. Not to mention that the rim producer sometime also expect you to use alloy washers under nipples.
Note: when measuring an ERD, take multiple measurements with nipple type, you will be building a wheel with later on, and average your readings.
In the context of our little experiment rim ERD measurement is also an important one. In fact, when dealing with radial spoke lacing patterns, a change of 1 mm in ERD will change your spoke length almost by a full 1 mm. This is because of the angle the spokes enter the rim. On the other hand, when dealing with cross lacing pattern the spokes, your margin of error will be smaller. In my case, remember that I am using 2 cross lacing, adding 1 mm to my ERD (590 mm) will make increase my spoke length calculation by 0.5 mm. I also found out that changing spoke count (going from 24 to 32 spokes) didn’t make a significant difference. To sum up, the most notable difference in ERD change happens when going from radial to cross lacing pattern. Bare in mind when building standard road bike front wheels!
K = 0.5 / 0.98
Offset spoke bed
The other rim variable is rim OSB. Offset spoke bed is usually specific to an asymmetric rim shape but not always. Spoke holes track can be center-offset even for perfectly symmetric rims.
If some hub measurements had an effect only on one side of spokes, rim OSB will change drive and also non-drive side spoke length. But not in an equal manner. A change in offset spoke bed (OSB) will have a greater impact on the spoke side where the rim’s asymmetry is facing. For the rear wheel this is non-drive side, while for the front wheel, this should be the drive side.
In my case, changing rim OSB from 0 to 1 mm changed my spoke length calculation for the left side by 0.12 mm and my right side by 0.06 mm. If you remember, this was the same exact change as in the case of changing the Flange to center measurement. That is because rim OSB works in the same way. I could leave rim OSB at 0 and use this correction in the Flange to center variable. The result would be the same.
K = 0.06 / 0.12
Enjoyed this article?
Buy me a coffee to support my work!
Every coffee helps fuel more content like this!
Final thoughts
Such little experiment should give you a better understanding of what measurements are actually important to get a correct spoke length in the first place. But, bare in mind, although some measurements are less important than others, meaning they have a lesser effect on your spoke length calculation, getting couple of those measurements wrong and errors will sum up to a greater overall error. Add to that also a never-ending rounding up/down spoke length question and you can quickly make a mistake.
Always, measure your rim and hub with upmost care, then double check your inputs. Better safe than sorry, they say. Enjoy wheel building!
About author

Aljaž Trenta
Author and founder"As a cycling enthusiast, bike mechanic and self-taught web designer, combining several of my passions and skills to build SpokeCalc was a great fun for me."