THE PREQUEL
Just recently I received a wheel for a service that had two loose spokes. Basically, it was a rebuild from already used components, which included a budget rim-brake rim, Sapim Leader 2.00 mm classic round spokes and now already discontinued Powertap G3 powermeter integrated hub. All in all, 24 spokes with 2-cross spoke lacing pattern on both sides.
The client briefly explained that he is experiencing loose spokes frequently. Shortly after a month of use, couple of spokes got loose, and the wheel become untrue and a bit wobbly. He took it to another bikeshop and again after less than a month, the problem reappeared. Then we met.
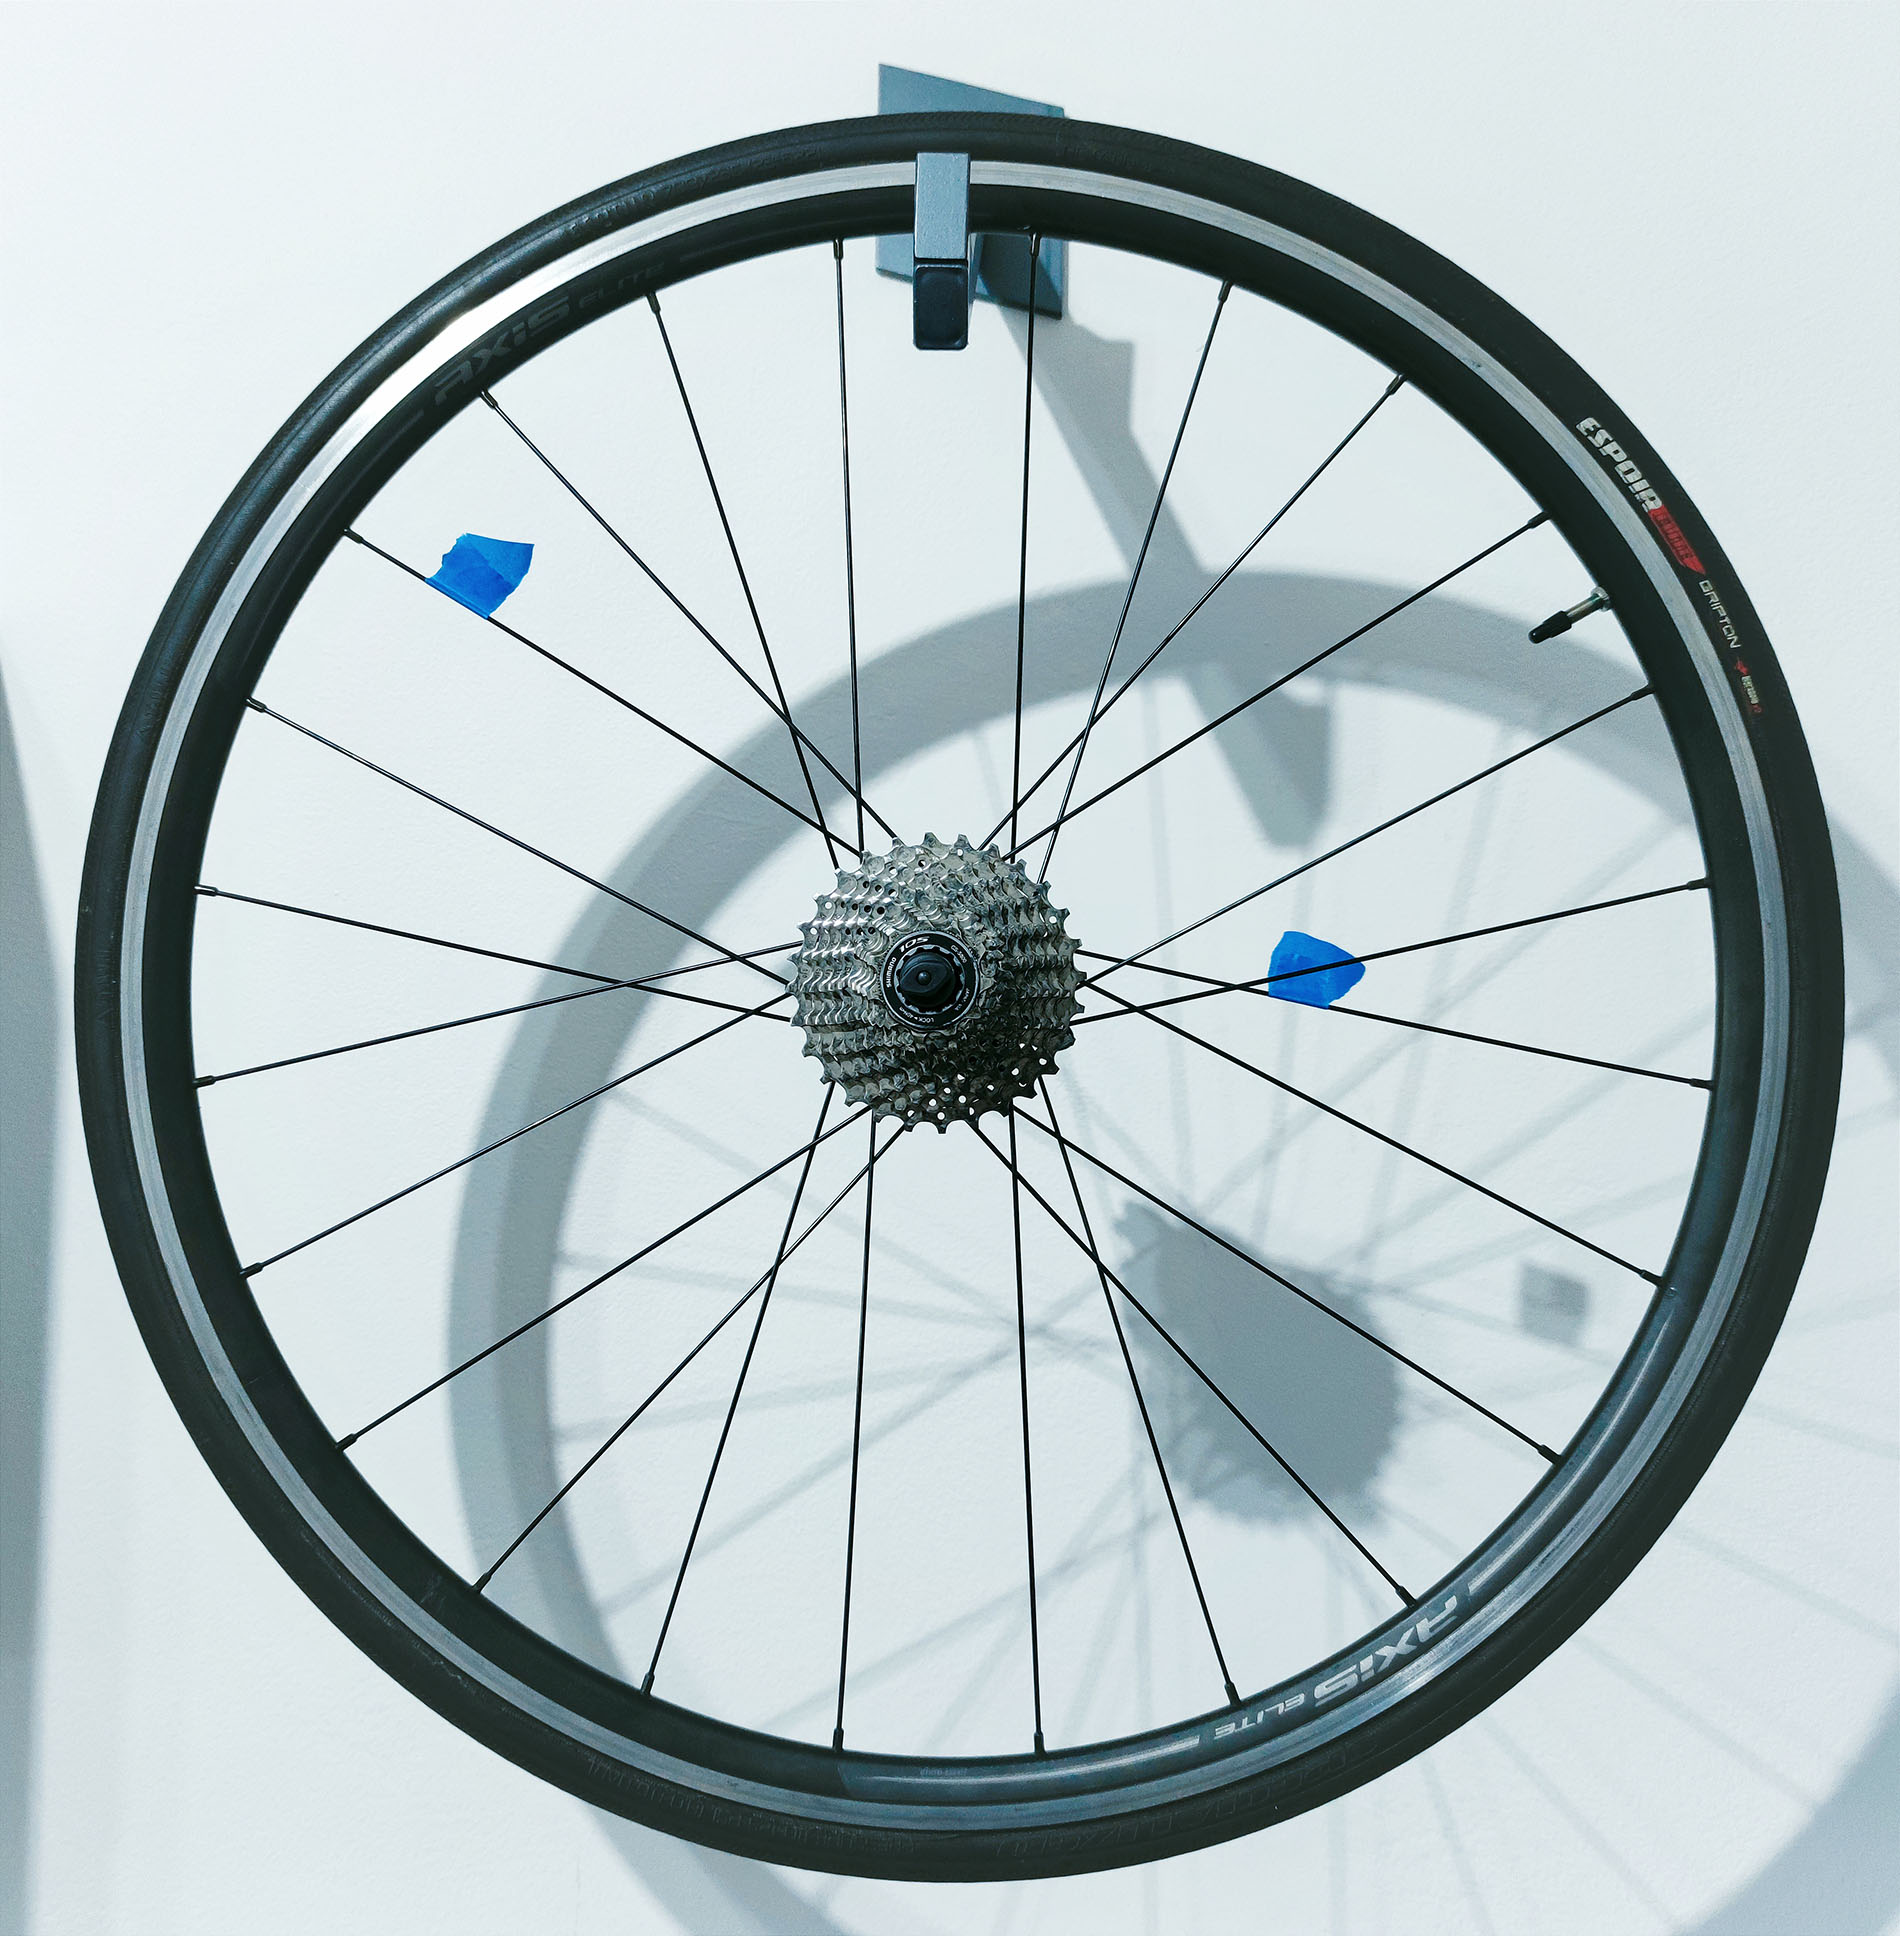
The wheel was laced accordingly to Powertap’s recommendations, having 2-cross pattern on both sides, avoiding any radial lacing. Also after my checking, the spoke length was dead on for both sides. So why then were spokes continue to come loose?
PERFECT IMPERFECTION
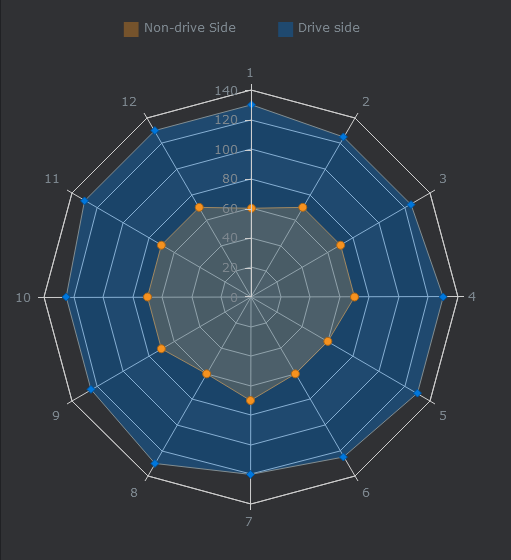
Seeing the wheel was still ridable and not dramatically out of true, I became interested in taking initial spoke tension readings to draw the imperfect radar chart diagram. As much as I expected a completely deformed radar chart of the improperly tensioned wheel I received, it still surprised me. It was like the case of perfect imperfection. A great learning tool for diagnosing the dangerous state of the wheel and a source of invaluable information about spoke tension.
So, take a look now at how "loose spokes" wheel reflects in a tension app’s radar diagram.
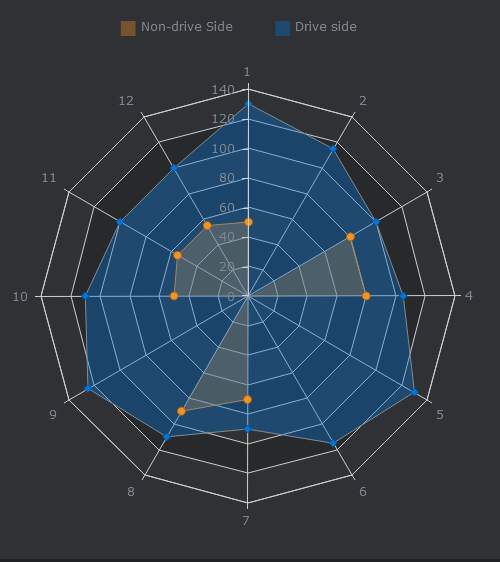
While two non-drive spokes were almost completely loose, as the diagram shows, there were actually four spokes with tension so low that Unior spoke tension meter 1752/2 didn’t even recognise it on the scale. Also, looking at the drive side of the wheel, the spoke tension varied from as low as 90kgF which was the minimum recorded spoke tension and up to 130kgF on the maximum side of the spectrum. All in all, results were all over the place, but in the truing stand, the lateral runout came at around 1.5 mm. Still giving a false impression it would be ridable to some degree.
Note: Radar chart is a good analytical tool for making a diagnosis of the wheel. Besides indicating improper or uneven spoke tension, it can also implicate a component (mainly rim based) failure. Fellow experts at Park Tool made a nice article on the subject of interpreting spoke tension app’s diagrams. Learn more about spoke tension in The definitive guide to spoke tension.
Loose spokes
Loose spoke problem may arise from different reasons. According to my experience the number one reason comes from improper and/or uneven tension between spokes on each side of the wheel. In the poorly tension-wise balanced wheel the weakest link are longer spokes with lower average tension which is usually the non-drive side. The spoke with the lowest tension may under series of vibrations or torsion forces eventually break or come loose and thus cause the whole set of spokes to fail gradually.
Too short spokes that do not fully engage in nipple head are also prone to untightening. These causes can be bypassed by using modern "tapered grip" nipples that offer maximum grip without use of adhesives, nipples with secure lock, or by using common spoke prep liquids.
In addition to that, while this particular cyclist wasn’t exactly on the light side, during our meeting, it was also discussed that spoke flex and therefore spoke loosening could be potentially reduced by changing the lacing pattern to 3-cross on both sides. As a preventive act.
Note: in every wheel service that includes broken or loose spoke, the whole set of spokes needs to be re-checked for spoke tension and balanced again to get close to the equilibrium as in the original state.
Let’s us now look what was to be done with the wheel.
A fresh start
After seeing the radar chart graph above, I almost instantly decided to completely rebuild the wheel. Disassemble all the spokes, clean them afterwards and finally lace the wheel according to my experience.
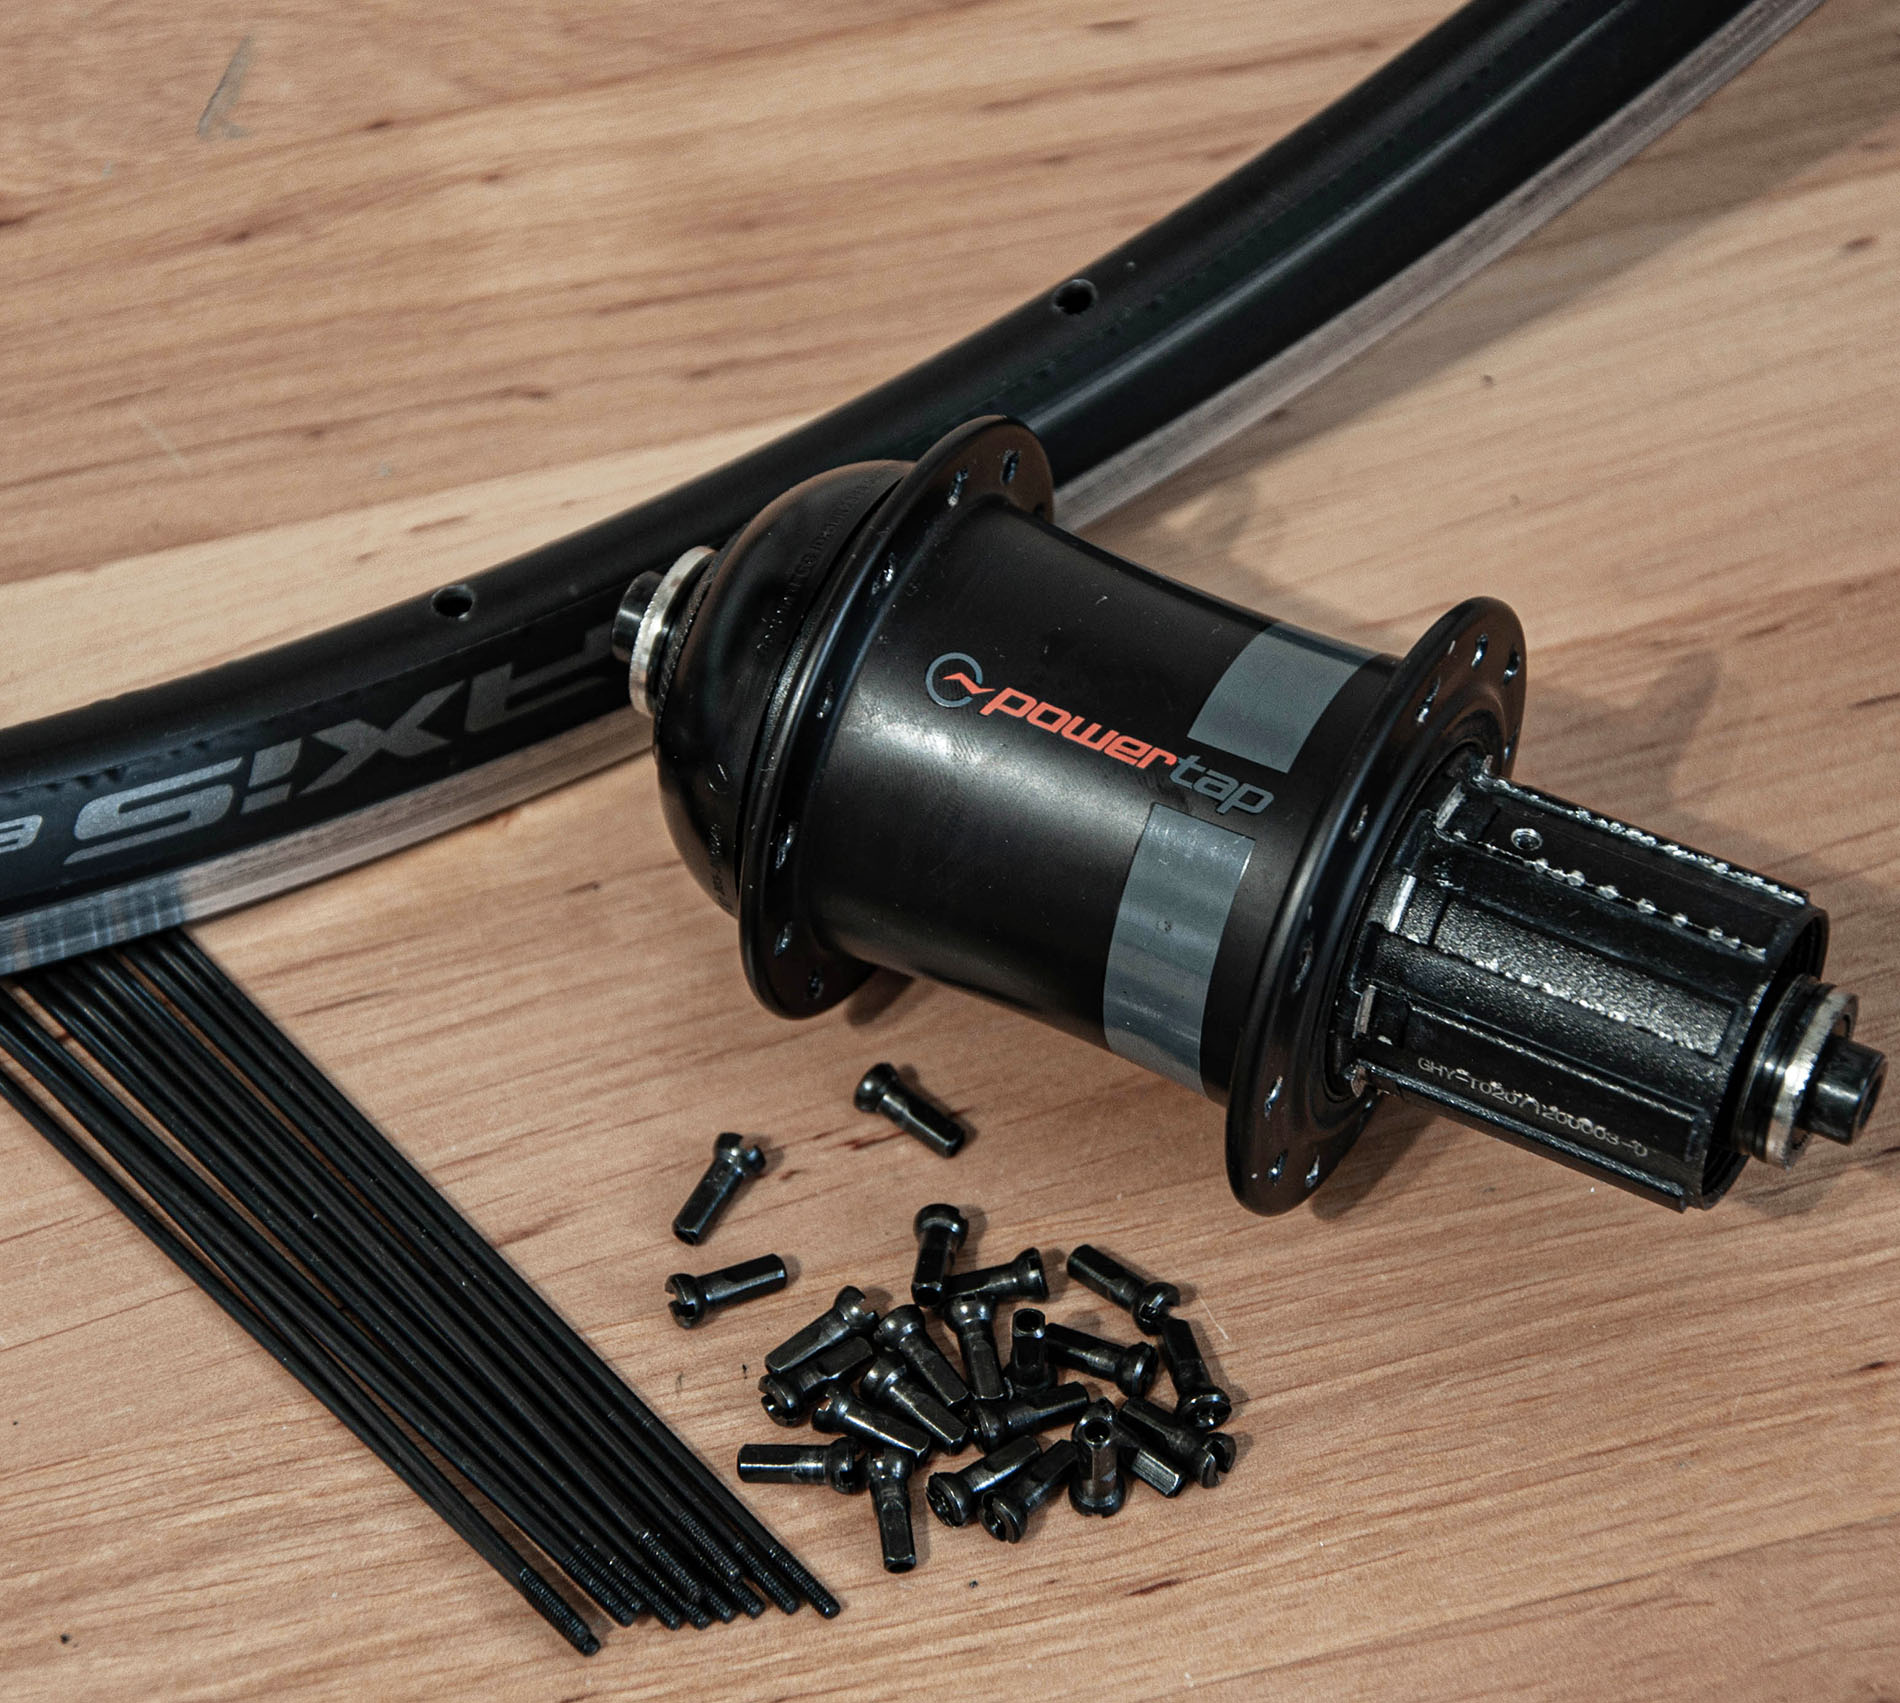
Disassembly of the wheel allowed me to re-measure the hub and the rim to get at least an estimate of the target spoke tension for the non-drive side of the wheel. If I opted for 130 kgF for the drive side, which I almost never exceed, then somewhere around 65 kgF would be the ballpark for the tension applied to the non-drive side.
Note: Target spoke tension is a calculation, which is derived during the process of calculating the correct spoke length in a spoke calculator. But you can also use this free Spoke tension calculator.
Another positive thing of opting for the complete wheel rebuild I found in having all the spoke threads lightly coated with my favourite spoke prep liquid. The Loctite 222. While it gently locks the spoke to the nipple, I would find its function more as a filler that dampens vibrations that could loosen the contact between a spoke and a nipple.
ACCESORIES
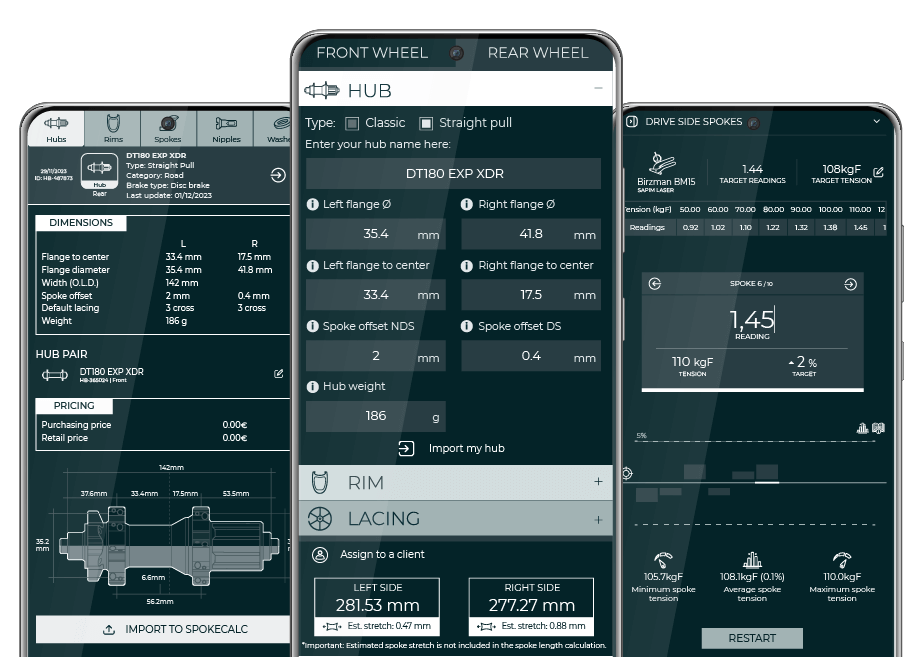
Wheel building may be an art, but it shouldn’t be a rocket science. In line with this thought, I decided to go with one of my budget spoke tension meters, the analogue Unior 1752/2. One of the reasons for picking the tool for the job was also in the Unior’s newly released Spoke tension app, which is free to use with this tool and by the way powered by the SpokeCalc.
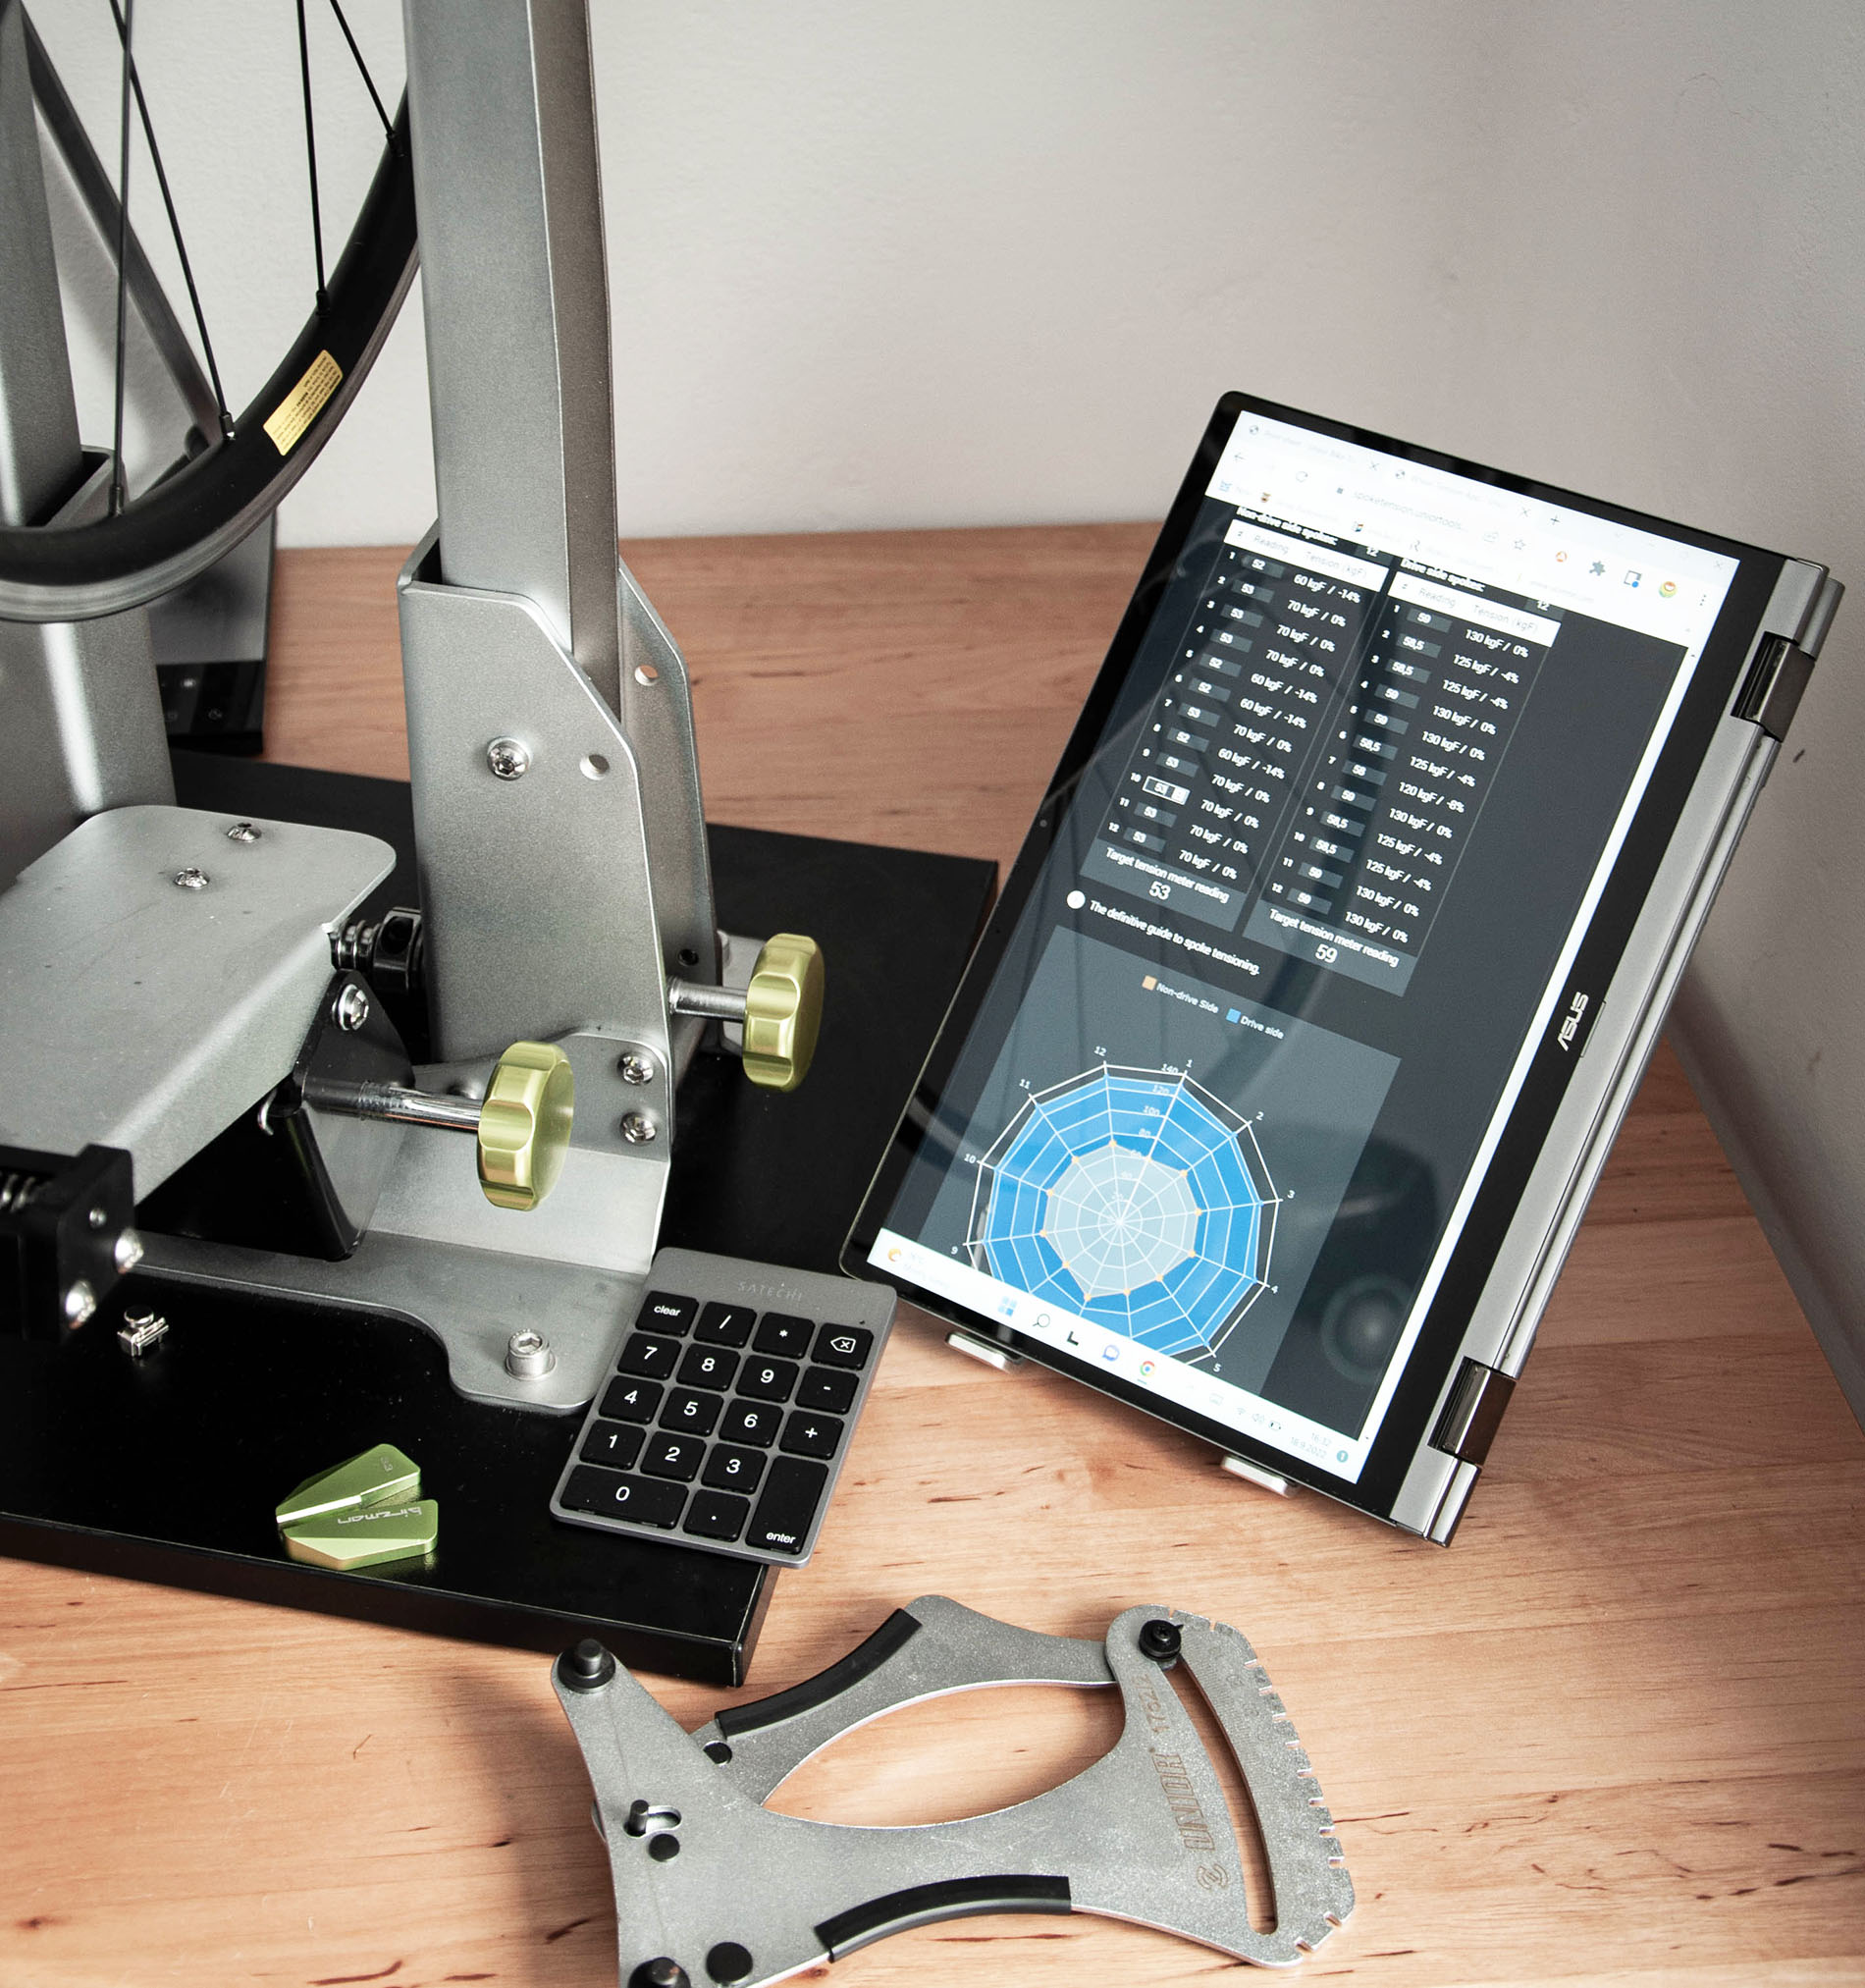
To make the data transmission smoother from my tension meter to the tension app used my new external numpad, that can make a wheel builder's life a lot easier. Read more on this gadget in one of the recent articles - Speed up your spoke tensioning, Refining the spoke tensioning workflow of your analogue tension meter.
Useful tip: regularly lube black pins of 1752/2 spoke tension meter where a spoke is engaged in a tension meter to get consistent spoke tension readings!
Total wheelbuilding app
More serious about the matter?
Then I recommend proceeding to the app.spokecalc.io site. If you want to take your wheel building skills to the next level, saving all components, storing all the wheel data and spoke calculations, and manage your clients list, then the SpokeCalc’s web based App is for you!
With all essential wheel building tools in one place, you can now digitalize your workshop and keep track of all your wheel building projects.
Wheel rebuild
Compared to the initial radar chart diagram which indicated severe problems with the wheel, taking final readings of this rebuild gave me a more satisfying overall state of the wheel, shown below.
Still not quite perfect, but spoke tension is at least far more balanced for both sides in comparison with the previous state. Also have in mind that such an analogue tool without high precision readings scale like this budget 1752/2 spoke tension meter hardly lets you get super geeky about achieving a perfect circle.
However, if you take a closer look, you will find a spoke combination under number 7 with readings a bit off for both drive and non-drive side of the wheel. What is actually happening there? While the drive side spoke shows a bit lower spoke tension, the non-drive side spoke in this spoke pair actually revealed a bit higher spoke tension reading. Looks like the wheel is in that point proned to the drive side.

Advice: would you sacrifice an even spoke tension for a perfectly true wheel? In my opinion that is not a compromise to be taken. If not pleased with the wheel trueness, I would rather advise a client to dump the rim and replace it with a new one.
Final thoughts
Taking wheel building lightly can lead to serious consequences. This real-life example showed how an improperly balanced spoke tension of each side of the wheel can gradually make the wheel structurally completely unstable, unrideable and even dangerous. Luckily the problem was addressed on time and with effective counter measures.
Furthermore, this article reveals there are reliable tension meters available on the market like Unior 1752/2 and with the use of a spoke tension app they can give a wheel builder an invaluable insight into the state of the wheel.
To sum it up, take all the time you need, be patient and clear your conscience by double checking if the spoke tension is balanced and in the ball park of what a spoke tension calculator has given you. That will guarantee a long-lasting wheel.
Happy wheel building!
About author

Aljaž Trenta
Author and founder"As a cycling enthusiast, bike mechanic and self-taught web designer, combining several of my passions and skills to build SpokeCalc was a great fun for me."